
The Arduino is a microcontroller development platform paired with an intuitive programming language that you develop using the Arduino integrated development environment (IDE). By equipping the Arduino with sensors, actuators, lights, speakers, add-on modules (called shields), and other integrated circuits, you can turn the Arduino into a programmable “brain” for just about any control system. It’s impossible to cover everything that the Arduino is capable of because the possibilities are limited only by your imagination. Hence, this post serves as a guide to get you acquainted with the Arduino’s functionality by executing a number of projects that will give you the skills you need to develop your own projects
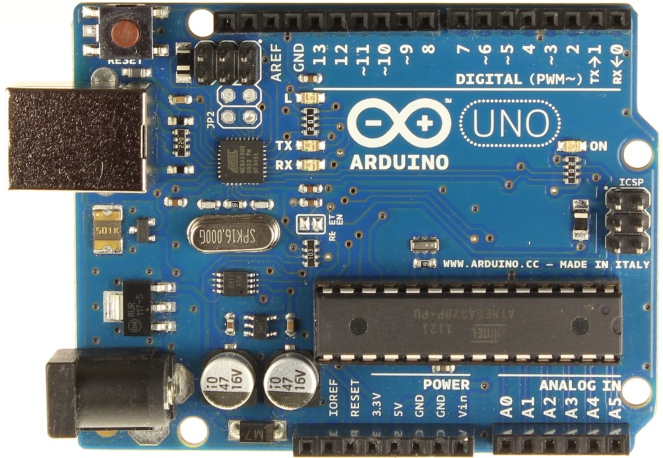
Technical Specification
| Microcontroller | ATmega328P |
| Operating Voltage | 5V |
| Input Voltage (recommended) | 7-12V |
| Input Voltage (limit) | 6-20V |
| Digital I/O Pins | 14 (of which 6 provide PWM output) |
| PWM Digital I/O Pins | 6 |
| Analog Input Pins | 6 |
| DC Current per I/O Pin | 20 mA |
| DC Current for 3.3V Pin | 50 mA |
| Flash Memory | 32 KB (ATmega328P)
of which 0.5 KB used by bootloader |
| SRAM | 2 KB (ATmega328P) |
| EEPROM | 1 KB (ATmega328P) |
| Clock Speed | 16 MHz |
| LED_BUILTIN | 13 |
| Length | 68.6 mm |
| Width | 53.4 mm |
| Weight | 25 g |
Differences with other boards
The Uno differs from all preceding boards in that it does not use the FTDI USB-to-serial driver chip. Instead, it features the Atmega16U2 (Atmega8U2 up to version R2) programmed as a USB-to-serial converter.
Memory
The ATmega328 has 32 KB (with 0.5 KB occupied by the bootloader). It also has 2 KB of SRAM and 1 KB of EEPROM (which can be read and written with the EEPROM library).

Very Good man …. Thanks
LikeLike